
If you are struggling with how to add Google Adsense to WordPress while adding the verification code or in placing the ads to the right places of the website.
Then this guide is a step by step explanation on how using a plugin or without a plugin, you can connect WordPress site to AdSense and can get Adsense approval and later by displaying Ads can make passive income.
You may be struggling at both points, so I will also give you bonus tips on how to get AdSense approval quick and once you receive Adsense approval which plugin would be the best to control or monitor Google Adsense ads for your site.
Must Read: Step by step guide to start a successful Blog
This guide will cover an in-depth step by step explanation on how to add Google Adsense to WordPress, but if you are in the process of creating AdSense account and looking for just how to add AdSense code in WordPress post then bookmark this page.
Later you can use another ad placement idea of the guide while placing the ads on your website.
Let first discuss what is Google Adsense in brief?
Google Adsense is a Google-owned advertising network that provides a low to high range of ads inventory to their publishers.
Google Adsense has two strong pillars,
- Advertisers – They bid for a specific keyword to display their ads
- Publishers – They publish content to display those advertiser’s ads.
We bloggers, are the publishers or content creators, on our published content, Adsense display ads and as a result, we make ad impressions and ad clicks money.
If your site has more Click through rates (CTR) on the AdSense ads then the earned money will be more as compared to impressions only hence focus on driving more traffic to the website, which is possible by minimizing the bounce rate.
But do you know the difference between Google Adsense vs Google Adwords?
Difference between Google Adsense vs Google Adword?
Google Adsense is an inventory of almost all sizes of ads that starts with $0.005 to $500 and AdSense is the responsible entity of Google which authorizes various publishers to display ads on their site or not.
If you place any Adsense ads on your site then the earned commission will be divided between Adsense and publisher and as a publisher of content, you will receive around 68% and rest will be in AdSense bucket.
But Google Adword is the platform for only Advertisers, through which, they place bids for the specific keyword.
If they won the bid then, their ads for that specific keyword will be displayed on the publisher’s content.
Now, let me give you an idea of how to open a Google Adsense account?
How to Open Google Adsense Account?
Opening an Adsense account means getting approved your website with Google Adsense. If you are not much familiar with Google Adsense then let me aware you.
That not all sites get Adsense ads, in order to display ads on your site your first step is to submit your site for Google Adsense approval.
If the site is got approved then only your site will start getting AdSense ads.
Let me go through a few easy steps on how to open an Adsense account?
- First Click here to navigate for Google Adsense home page.
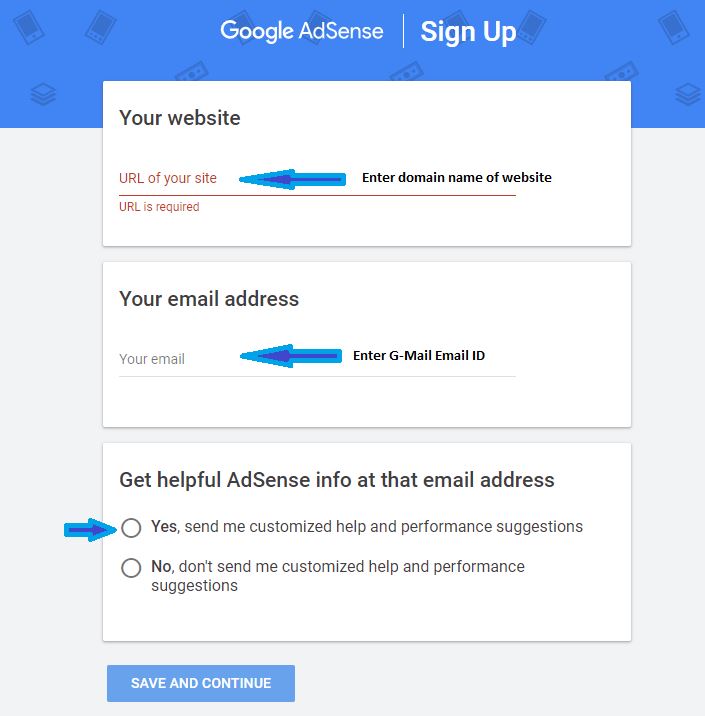
- Click to Get start or Sign up option and it will navigate to Sign up window.
- Provide the full domain name of your website in Your Website Edit Box as shown below.
- Provide the Email address registered with Gmail to signup an account with Google.
- At the bottom choose, Yes to get timely suggestions by Google Adsense.
- Once done with all just click to the Save and Continue button.
- In the next window, select your country in which you are currently living as based on the country your earning will be paid in the local currency and all the verification code and communication will be carried to that address only.
Note: If you are living temporarily outside from the permanent resident country then always chose the country of your permanent resident as Google Adsense won’t allow switching the country.
If you want to change the country then, you have to close the account and need to reapply from the new country as there is no way of shifting the account.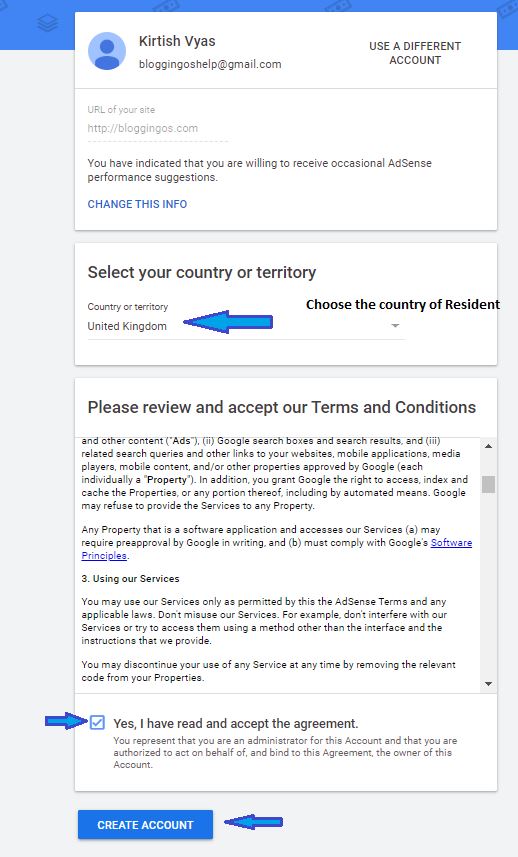
- After providing the country name an option to accept the Terms and conditions will be visible, so read the same and accept the T&C.
- Click to Create an account and you are done with successful signup.
- Once you are done with signup then Google Adsense will ask you to provide the address details, so just fill it and submit the same, do remember you can change the address within the country anytime but not the country.
Hurray !! You have successfully signed up for Google Adsense.
But still, you haven’t applied for Google Adsense, to send for approval we need to add an Adsense verification code with our website to verify ownership of the website which we submitted to Google Adsense.
Now let come to the next step on how to add Google Adsense to WordPress for verification?
How to Add Google Adsense Code With WordPress in Header?
Every time after successful signup with Google Adsense, you will be given an AdSense verification code within the account itself, which has some instructions and are mandatory to finish before sending the site to AdSense approval.
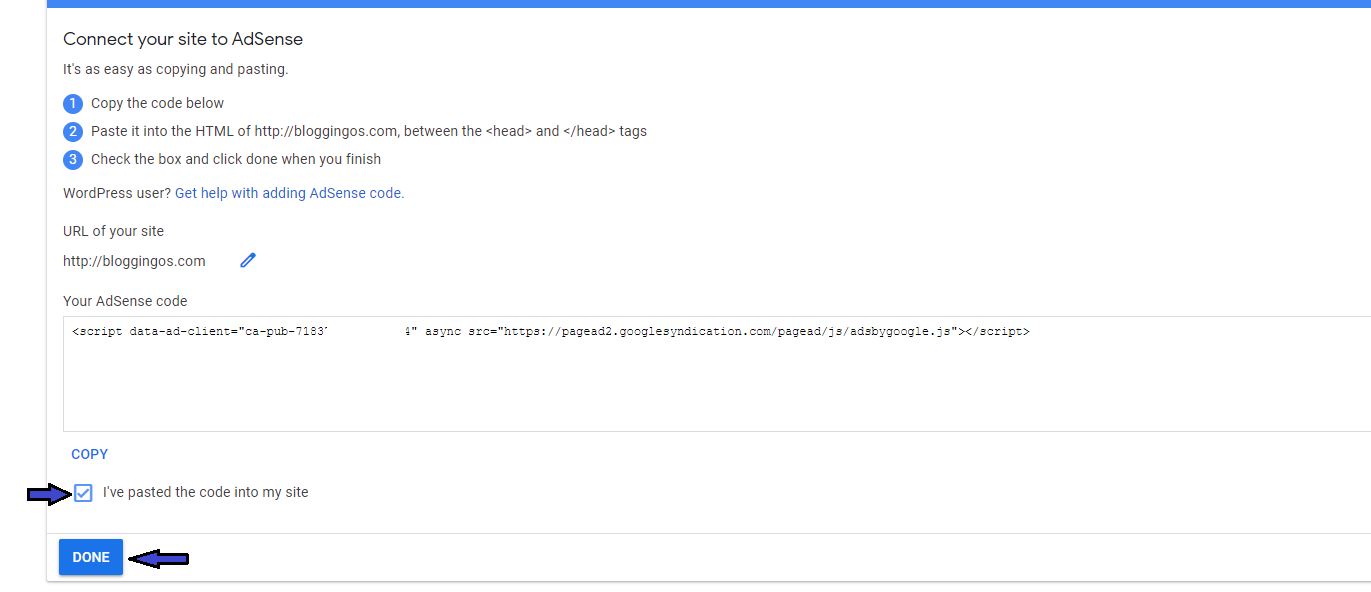
Upon successful signup, you will be having a screen like as shown below.
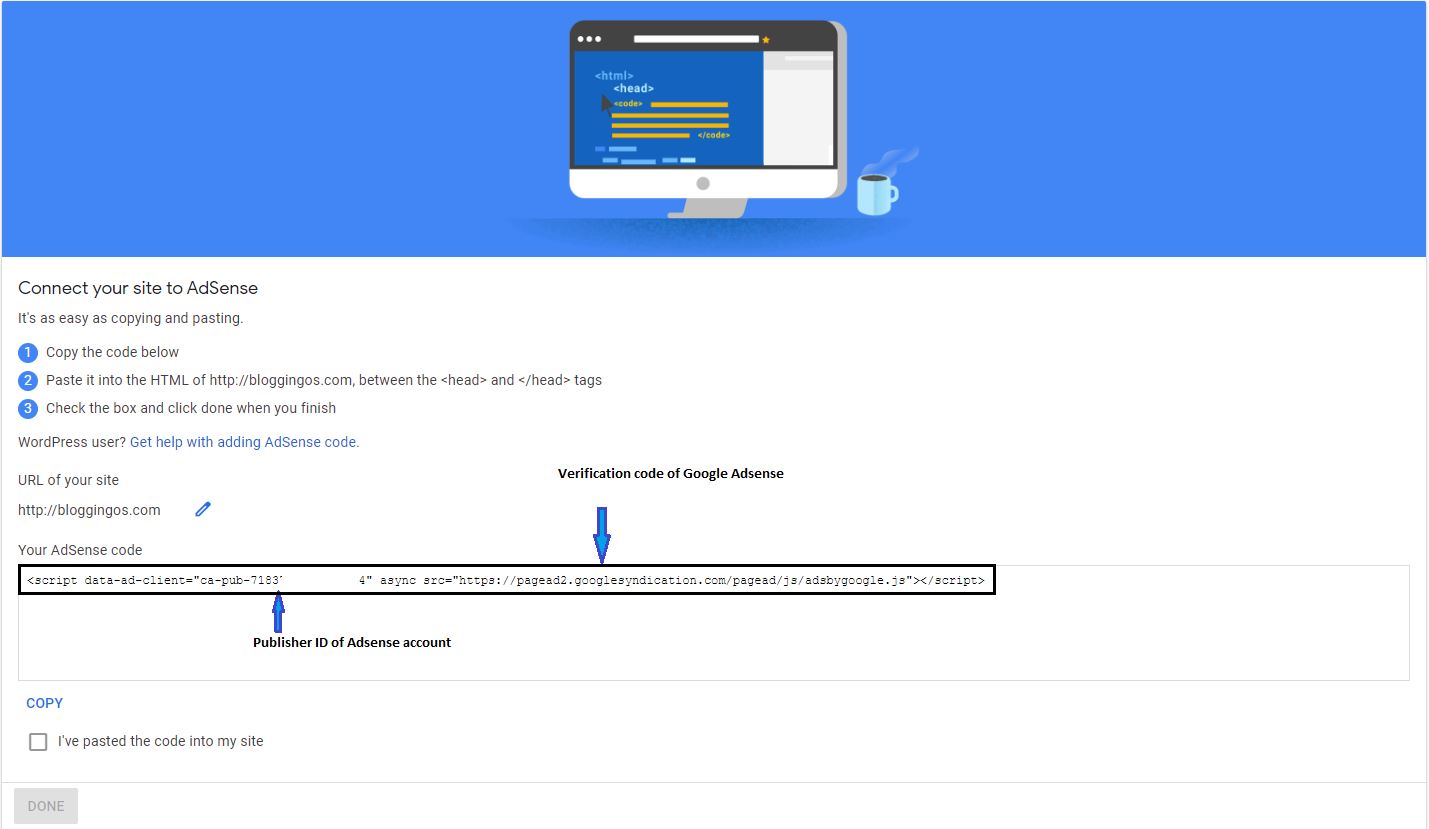
There is an instruction to add this complete AdSense verification code to the header of the WordPress website, which is ideally in your theme editor in between the <head></head> tag.
I have to hide my publisher ID, as it will be a kind of unique id for your AdSense account, but you know why we need Google to connect WordPress website with Adsense?
Because WordPress is a third party content management suite and Google Adsense is a different product, so there should be communication needed in between both of these platforms so Adsense can place relative ads on your site.
Now when it comes to how to connect WordPress site to AdSense or how to activate Adsense on WordPress then there are two way’s to do so.
- Add Google Adsense verification code to WordPress without plugins.
- Add Google AdSense verification code to WordPress with plugins.
Let me guide you first on how to add AdSense verification code to WordPress by placing it in between the header tags of the theme editor.
How to add Google AdSense code to the WordPress Header by Theme Editor?
Almost every WordPress website owner user 3rd party themes to customize their WordPress website even on Bloggingos, I am using the Generatepress lightweight theme.
No matter which theme you are using, adding the AdSense verification code in the header tag of WordPress will always remain the same, so follow the below steps.
- Go to WordPress Admin Dashboard and navigate to the Appearance>>Theme Editor.
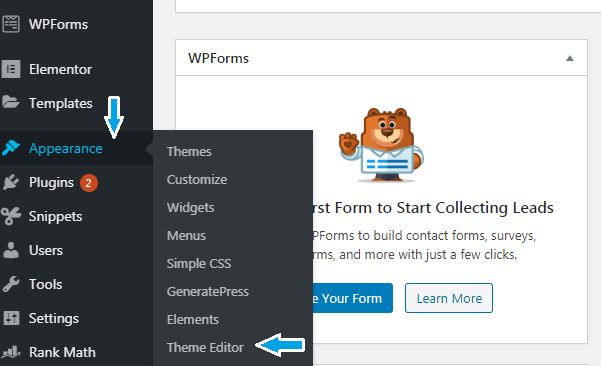
- After clicking Theme editor, you will be navigated to the backend coding of the theme and their select header.PHP as shown below and a new code specifically related to the header area of the theme will be display there.
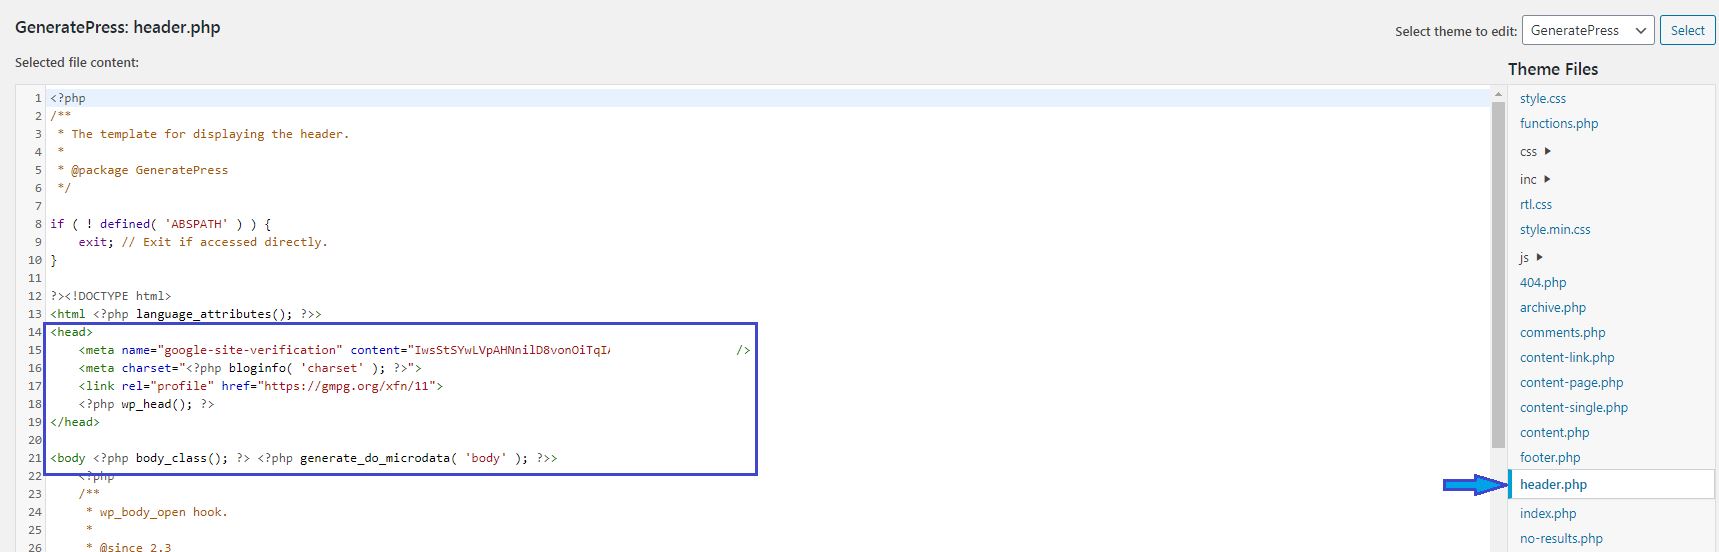
- If you will refer the above screenshot, then in header.php file, we have highlighted an area in which code is bounded within <head></head> tag and then just after new <body> is started. Make sure your theme should have the same code if you are using different themes.
- As instructed by Google Adsense, we need to copy Adsense verification code after <head> tag and before the closing of </head> tag, here I created a space just after <head> tag and pasted code there.
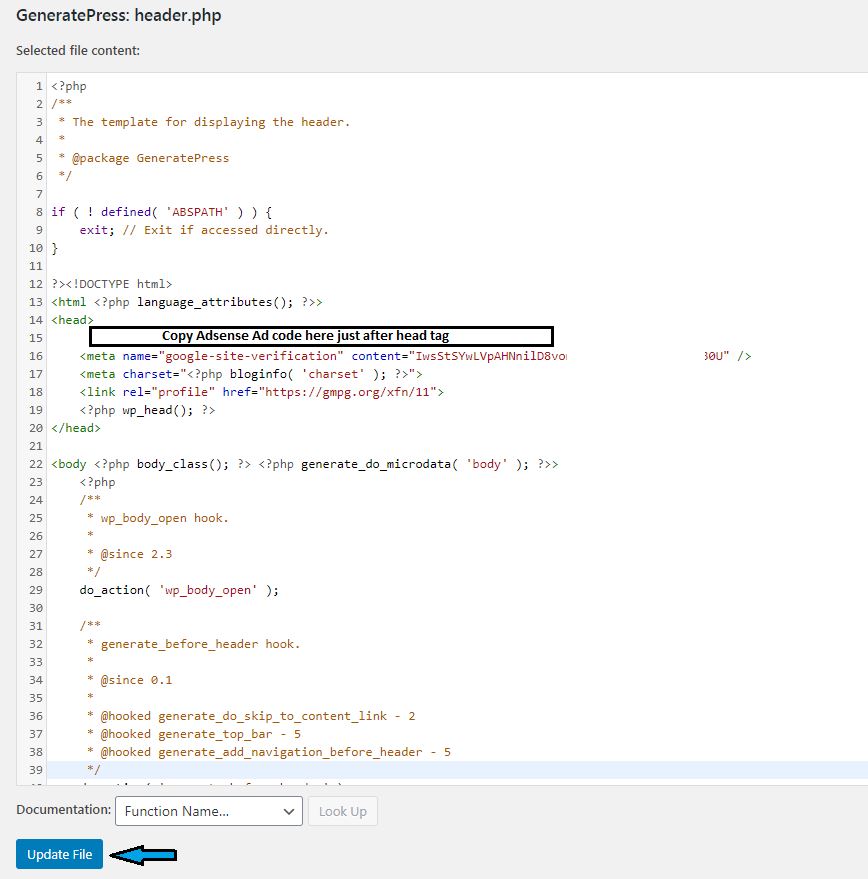
- After pasting the code click to update file and a successful file update message will be displayed.
- Go back to Google Adsense and click to “I have pasted the code into my site” and click to Done.
- Once you click done, Adsense will validate the code in your site and if all ok then there will be no error message but if issue then there will be an error message to paste them correctly.
- After successful verification, your site will automatically be sent for the AdSense approval review purpose, now next is to sit tight and wait for their response back which may take at least 24 hours to 2-3 week max.
Note: Adding the Adsense verification code to the theme editor might be a bit technical step and I do not recommend anyone to mess with the existing theme code else this may ruin your all website.
Always, copy the complete code of Header.php in a notepad, so during the number of copy-paste times, if there is any issue you can change that back to the original from the notepad code copy you have already taken.
While working with WordPress not only Google Adsense but there are multiple other codes you need to paste within the header tag such as.
- Google Adsense
- Google Webmaster
- Google Analytics
- 3rd party site monitoring.
Hence the best feasible solution for the addition of AdSense or other verification code to the header of a WordPress site is using a plugin.
How to add Adsense code in Header of WordPress with Plugin?
In WordPress, almost everything is easy to control using a free or paid WordPress plugin and answers to solve your query on how to add Google AdSense verification code to WordPress is also a single click solution.
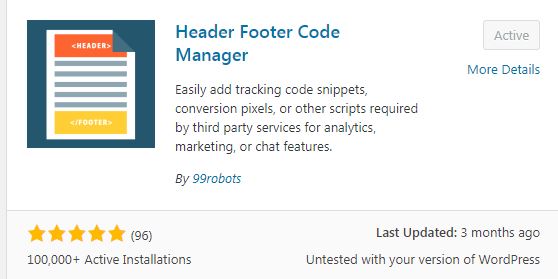
There is a free plugin with the name of header footer code manager, just add that plugin into your WordPress plugins library like other plugins.
Here are some simple steps to follow for adding a new plugin to WordPress.
Go WordPress admin Dashboard>>Hover to plugins>>Click to Add New>> Search for the plugin name “header Footer Code Manager” >> Click to install >> Click to actie.
Done, easy simple and fast.
Now let head over to setting of the plugin from the all installed plugins list, here are steps to navigate.
Go WordPress admin Dashboard>>Hover to plugins>>Click to Installed plugin>> Find the active HFCM plugin>> Click to setting

This time is to add a snippet in the plugin, here in our case that snippet will be to add AdSense code in the header part of the WordPress, so do follow below steps.
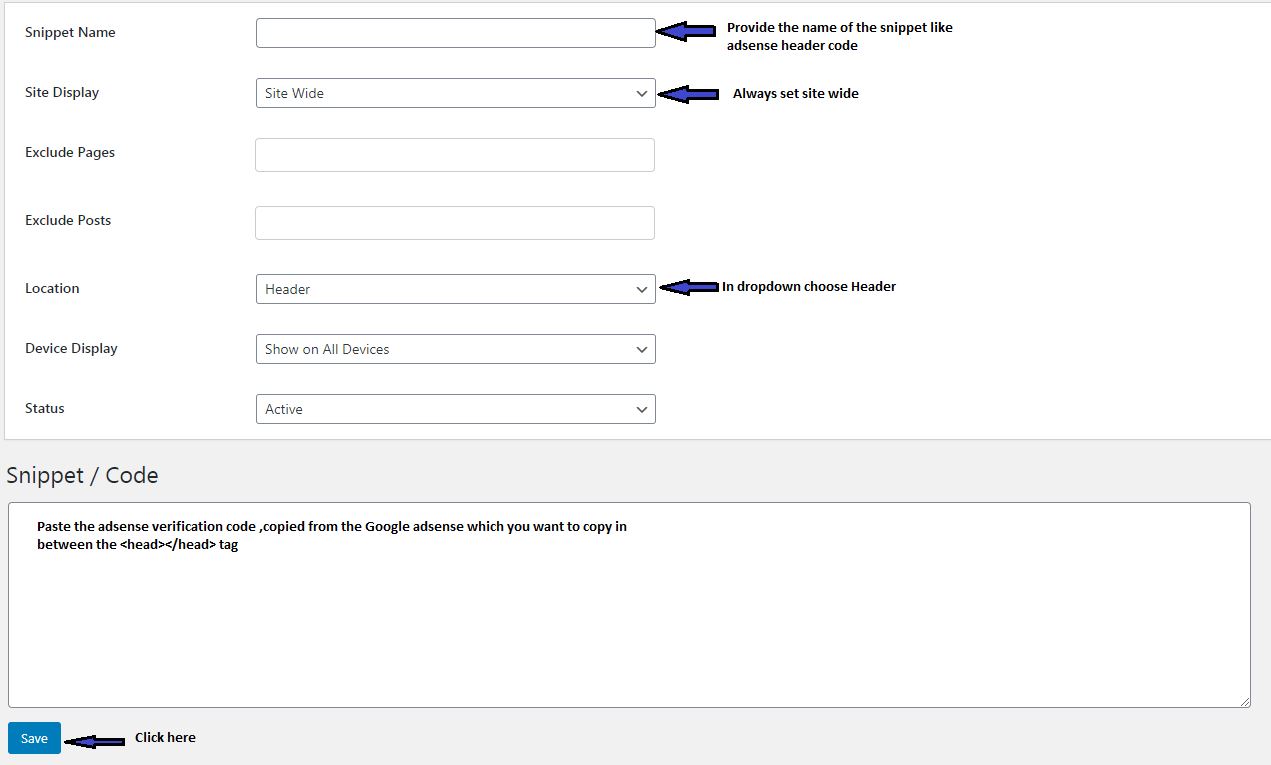
- Click to Add a new Snippet.
- A new window will open there in Snippet name provide any name as in our case, we will be naming this as Google Adsense header code.
- Choose Site display as Sitewide this ensures the code value pass-through complete site, not any specific post or pages.
- Leave Exclude post and pages as en empty and head over to the location and select header this ensures your code paste in between <head></head> tag only.
- Choose device display as show on all devices, which cover mobile, tablet, and desktop.
- Select status as Active and past the AdSense verification code in the Snippet/code editor and click to save button.
Done, you have successfully added the snippet and Adsense verification code in the WordPress site, once again go back to google Adsense and repeat the steps that click to “I have pasted the code into my site” and click to Done.
If all good then your site will be sent for the review and wait until it gets verified by the Google AdSense.
Isn’t it simple?
Using these two methods, you can verify your WordPress site with Google Adsense but make sure if you edit manually in head.php file and in future if you will change the theme then the Adsense code will be removed from the site, so better to use plugin which will be easy and active all the time.
Let me give a brief idea for those who are asking how to add AdSense code in WordPress post?
How to add Adsense code in WordPress Post?
Once your account is Google Adsense approved then you are eligible to create the various Ad codes using the Google AdSense account.
As in Google Adsense, you have the facility to generate the manual Ad unit and the other is Google auto Adsense ad codes. Let me help you with how to generate a manual ad unit and add them to the WordPress site.
Go to your AdSense approved account then there will be an option for Ads, if an account is approved then it will be enabled to click, just click the same and then click to By Ad unit.
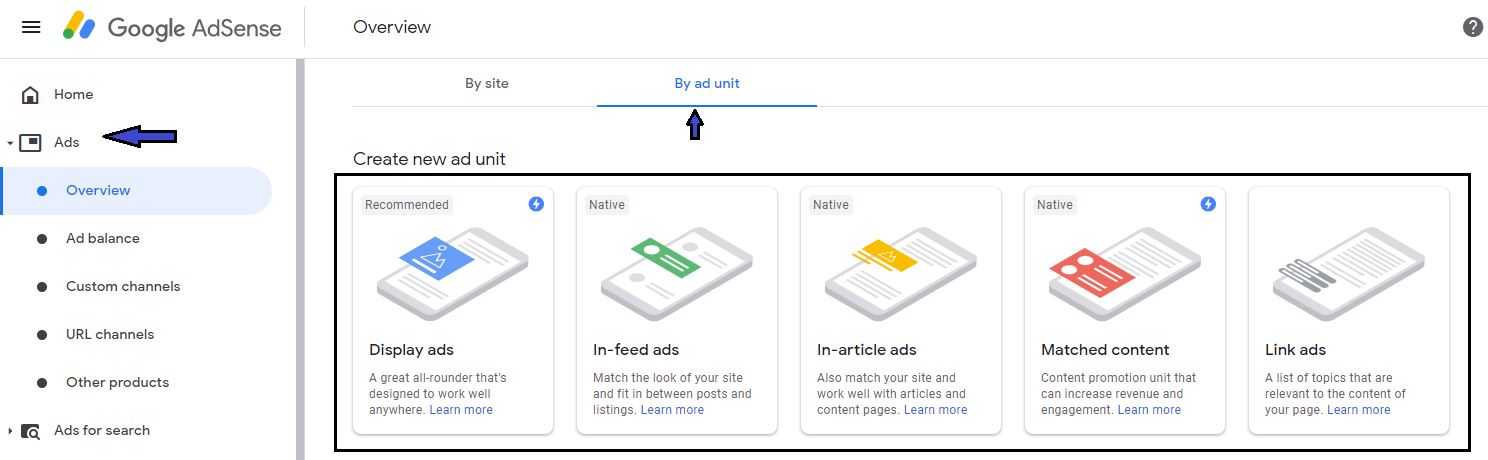
Here you have more than 4 options but do remember with the new account, you won’t have an option for link ads but you can choose any one of them, here the best fit will be Display ads.
Click to Display ads and a new window of different ad sizes will be displayed as here you can see we have three options:
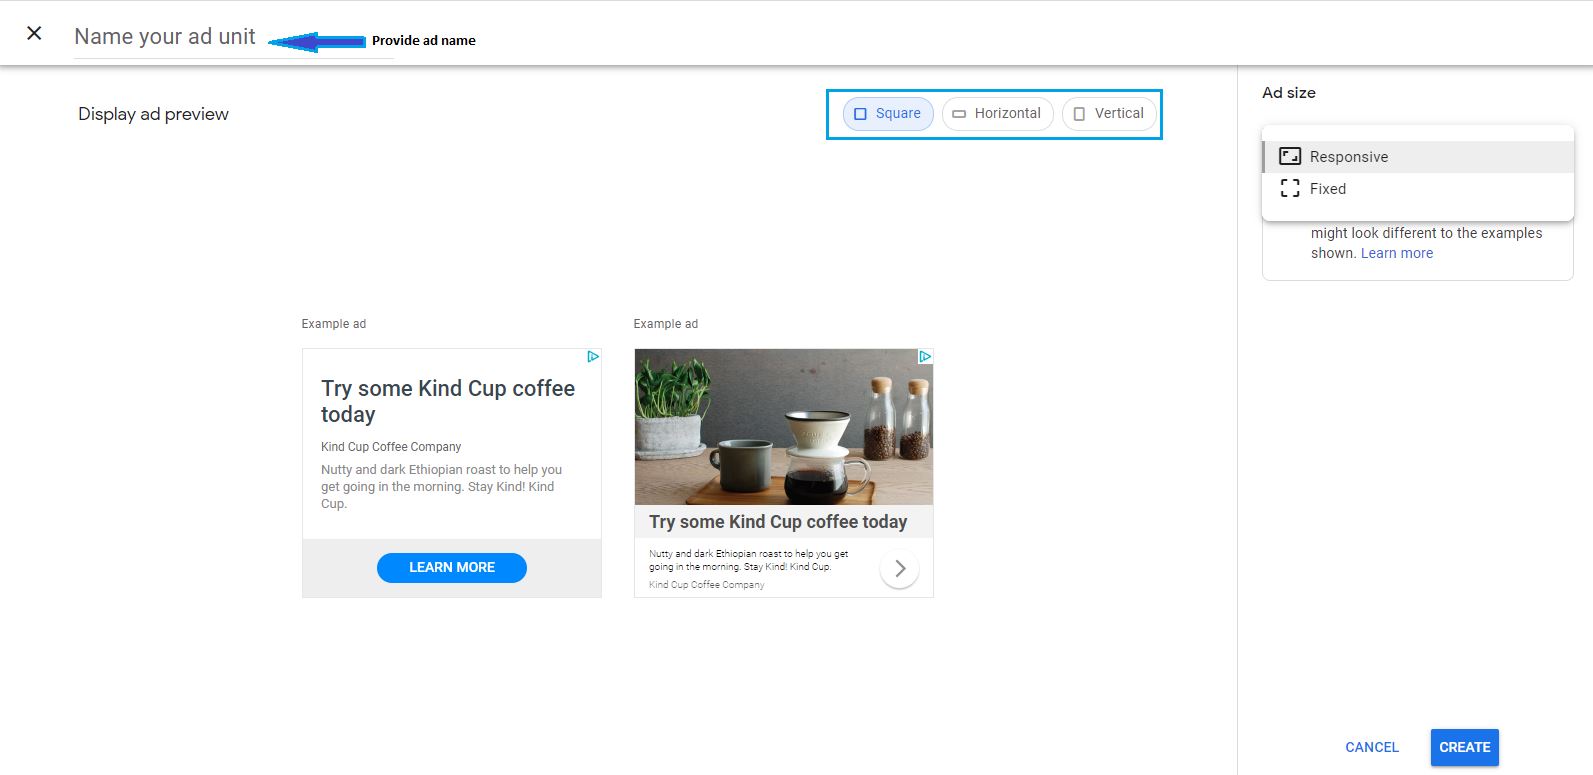
- Square – Recommended using on the sidebar or middle of the content.
- Horizontal – Recommended to use before, after or middle of the content but not on the sidebar.
- Verticle – Recommended using as verticle sidebar only for the skyscraper purpose.
Recently Google Adsense made all their ad sizes are responsive, so ideally no need to change in the ad size else you can set any fixed size if it required, so just provide ad name and click to create then an ad code will be generated.
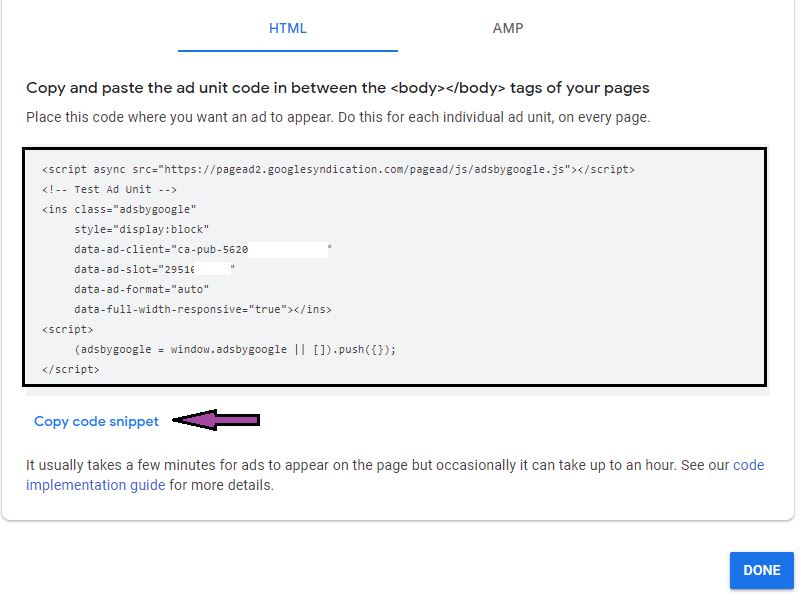
On this new screen, you will have an HTML code, this code is your AdSense ad code, so just click to a Copy code snippet and head over to Google Adsense.
In Google AdSense to add an ad, there are two different sections to cover
- Ads on the sidebar
- Ads to the middle, top or bottom of the content.
How to add AdSense Ad on the sidebar of WordPress?
To add, Google Adsense ad on the sidebar of the website, you need to do that process manually and below are the steps that need to follow.
- Go to appearance and Click to widgets of the WordPress admin.
- To add Adsense drag Custom HTML from left to right-hand side, under Right Sidebar.
- Expand the custom HTML and there is an editor window, so just copy AdSense ad code and click to save.
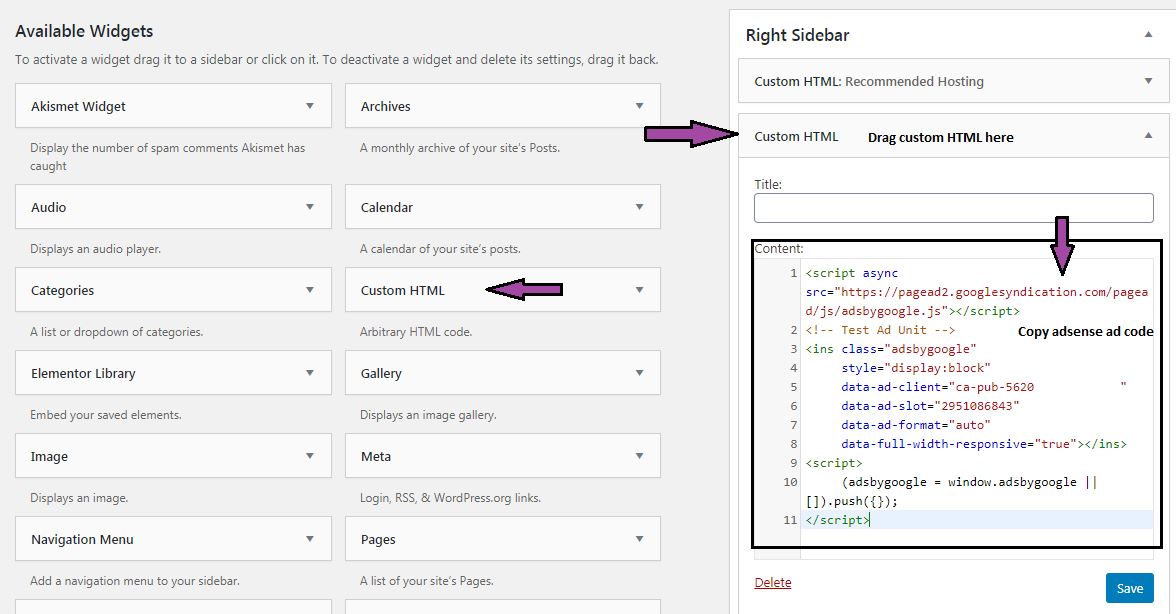
You are done with AdSense ad placement on the sidebar of the website and in a similar way you can drag and drop multiple Custom HTML on the sidebar and can copy-paste new ad unit on the sidebar.
Now let discuss, how to place Adsense ad code in the middle of the content using a WordPress free plugin.
How to Add Adsense Ad in the post using WordPress Plugin?
If you will start putting the manual ad code to the different posts or pages in WordPress site then it will be a hectic job and there will be a chance that in future you might change the ad code, hence the best solution is to use a free WordPress plugin.
I recommend, you to use only one plugin and that is Ad inserter, this will be the perfect one point solution for your desktop or tablet site ads placement.

Q: Can we use Ad Inserter for the AMP site ads placement
Ans: No, If you are using AMP then do not place ads using the Ad inserter as AMP does not support javascript and if you place ads using Ad inserter then you will get index error in Google webmaster.
Here are a few steps to follow on the use of ad inserter.
- Go to Plugins then click to Add new and search for Ad Inserter.
- Click to install and activate the plugin.
- Go to Installed plugin and find out Ad inserter in the installed plugin list and click to Setting.
- There will be a window of a total of 16 ad blocks, where each block can be used to place ads on different places of the website.
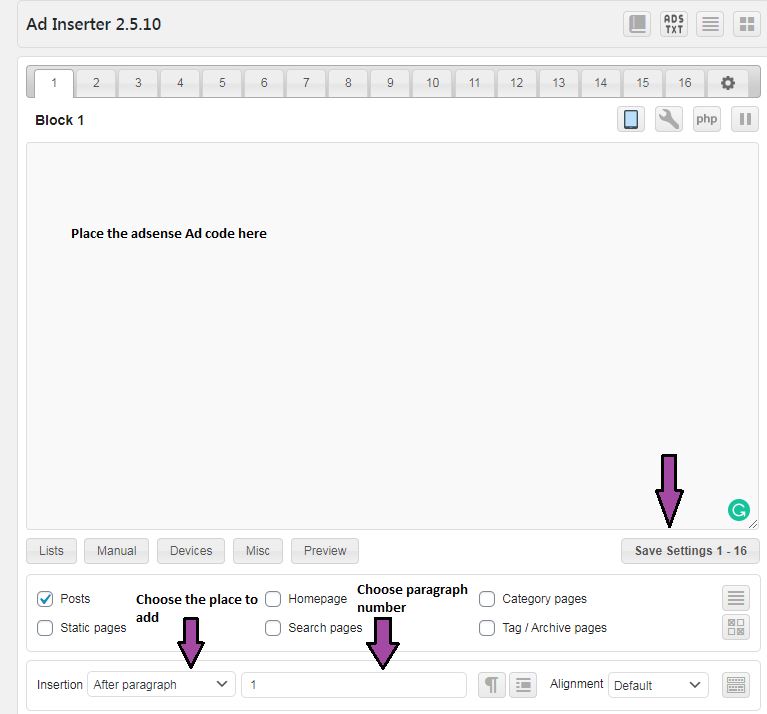
- Choose one of the block and place AdSense ad code in it
- In insertion dropdown, selects the position of the ad, as I selected after paragraph then provide the number of paragraphs. (You can choose before post, after post, etc in another block)
- Once all entries are done then hit save all set.
Hurray!! now that ad will be displayed to that specific position throughout the website, where you can change the ad displayed only on post or pages or homepage by check or uncheck the boxes.
The simple, easy and free process to place Adsense ads on WordPress website.
If you are not familiar with Ad inserter then here is a list of 7 Adsense ad insertion plugins by WPBeginner. You can try the one which you like the most.
I hope you got an idea of, how to add Google Adsense to WordPress but before closing this guide here are bonus tips on how to get AdSense approval quick.
How to get quick Adsense approval?
With an increasing number of websites, it is very critical to get quick Adsense approval but there are few guidelines which ensure you to get close to 100% Adsense approval.
Find below the strategy or checklist I do follow to get quick Adsense approval.
- Your website should have a custom domain, preferable is gTLD or ccTLD.
- Your website domain must be older than 4 weeks.
- The website should have a few mandatory pages such as About Us, Contact Us, Privacy policy.
- At least 10 posts should be already published and should have an average content length in between 1000-1500 words.
- Connect your site with the social media account, which ensures the legitimacy of the site to the reviewer.
- Do not write any plagiarized or duplicate content by copying it from another site.
- Do not write, thin content which means a post with words length of 300 words.
- If the blog is on WordPress then make sure you use the fastest hosting for faster page loading speed, I use A2 Hosting.
- The website must be customized with a neat and clean responsive theme, here I use Generatepress.
Well above few checks are good enough to ensure that your site is ready for Google Adsense approval and if all ok just do submit as explained above and wait for in between 24 hours to 4 weeks.
The AdSense team will drop you an email whether your site is approved or not if not then after fixing that particular issue you can re-apply instantly.
Wrap up on How to add Google Adsense to WordPress
When it comes to adding the verification code then I recommend using the Plugin, as it makes your job easier and whenever you change the theme the code will be there with a website.
If you use the theme editor then with a change of theme that header.php section will be replaced and you will need to add that AdSense code with the new theme of the website.
Once your AdSense account is approved then for the placement of the ads, always use the plugin like Ads inserter this will make your job easier to monitor the Adsense ads on various places of the website.
I hope you like this master guide on how to add Google Adsense to WordPress, let me know in the comment which Adsense plugin you use and how many times you got AdSense approval in a single try?